How to Set Up a Pool Table: Step-by-Step DIY Installation Guide
Setting up a pool table yourself takes 8 to 12 hours over 1 to 3 days and runs $130 to $375 in tools and materials, saving $250 to $500 in pro install fees if you nail the leveling. The whole job comes down to slate flatness and rail-bolt torque. Get those two right and the table plays correctly for 20 years. Miss either one and every shot lies to you.
If you’re going to buy one tool for this job, buy a real 24-inch box-beam level. The Stabila Type 80A is what most home installers settle on. Anything shorter than 24 inches misses gradual slope, and cheap levels twist enough across that span to give you a 1/8-inch reading error before you start.
This guide is for a slate table, three-piece or one-piece. MDF tables ship pre-assembled or close to it; the steps are similar but the leveling tolerance is wider because MDF doesn’t hold its shape past a few seasons anyway. Slate is what we’re solving for.
What You’re Actually Doing
A pool table install is really three jobs. The first two are getting the frame square on flat legs and the slate dead level on top of it; the third is stretching the cloth without wrinkles. Everything else is sequence and bolts.
The frame and legs absorb the worst floor irregularities. The slate has to be flatter than the frame because that’s where the ball rolls. The cloth has to lie tight across the slate without bias-pull marks. Those three jobs happen in that order, every time.
Budget the time roughly like this: 1 hour to unpack and inventory, 2 hours frame and leg assembly, 1 hour slate placement, 1 to 3 hours leveling (the variable that decides everything), 30 minutes seam waxing, 2 hours cloth installation, 1 hour rails and cushions, 30 minutes pockets. Add a second pass on level after cloth is on, since slate sometimes shifts when you bolt the rails down.
Tools and Materials You’ll Need
A real install needs about 11 tools and 5 consumables. The level is the one piece nobody should compromise on. Everything else has a budget option that works fine.
Must-have tools:
- Adjustable wrench and a socket set
- Phillips and flathead screwdrivers
- 24-inch box-beam spirit level (don’t substitute a 12-inch)
- Pool ball or a 1/2-inch steel ball bearing for roll testing
- Tape measure (25 ft minimum to check diagonals)
- Rubber mallet or deadblow hammer
- Allen wrench set (most rail bolts are 1/4-inch hex)
- Composite or hardwood shims, never folded cardboard
- Staple gun (Arrow T50 is the standard) and 1/4-inch staples
- 24-inch steel straightedge for slate flatness checks
- Putty knife or plastic scraper for waxing seams
Consumables:
- Pool table beeswax (1 lb minimum for three-piece slate)
- Replacement cloth, if needed: Championship Saturn II is the Amazon default
- Microfiber towel for slate cleanup
- Painter’s tape for marking spots
- Clean white rag (no dye, no fabric softener residue)
Optional but useful:
- Cloth-pulling tool / pin stretcher: speeds rail wrapping, but a strong forearm works
- Laser level: handy for double-checking long diagonals
- Furniture dolly with non-marring wheels: only if you’re moving slate more than 6 feet
Most quality tables ship with a parts list and basic hardware, and usually a bag of beeswax. Read the manufacturer’s manual first; some makers (Olhausen, Brunswick) include a torque spec and a pocket-template printout that saves real time.
Levels: which one you actually need
Not every “level” is the same tool. The wrong level will tell you your slate is flat when it isn’t. Match the level to the job before you look at prices.
| Level type | Typical price | Accuracy | When to use |
|---|---|---|---|
| 24-inch carpenter’s spirit level | $25-$60 | ~0.029° (0.5 mm/m spec) | Default for home install. Stabila Type 80A is the go-to. |
| Smartphone level app | Free | ~0.1° (worse with case on) | Quick sanity check only. Remove the case. |
| Digital torpedo level | $40-$120 | ~0.05° | Numeric readout helps when shimming. Battery-dependent. |
| Machinist’s level | $100-$300 | ~0.005° (0.0005”/foot) | Tournament setup or fixing a “feels off” table that passes carpenter-level checks. Overkill for first-time installs. |
For a home setup, the 24-inch carpenter’s level is the right answer. A machinist’s level reads variations smaller than the slate’s own surface noise, which just makes it harder to use. Save it for after you’ve got the table close.
Stabila 29024 Type 80A 24-inch Level (~$60)
A 12-inch level misses gradual slope. A budget 24-inch level twists across the span and gives you a 1/8-inch error before you start. The Stabila Type 80A is rigid enough to hold a true reading and short enough to span one slate piece without bridging seams. It’s the level most home installers settle on after they’ve returned a cheaper one.
Check Price on Amazon →Step 1: Choose the Room and Prep the Floor
You need a stable floor and the right room dimensions, plus humidity in the 40 to 50 percent range. Concrete is best, then hardwood; carpet is a distant third. Vinyl plank works but expect to relevel after the first month.
For room size: plan on roughly 5 feet of clearance on the long sides and 4 feet at the ends, enough for a full 58-inch cue stroke on most shots. Use the pool table room planner to map your exact space, or check the standard pool table sizes reference for the math.
| Table size | Playing surface | Min room (58” cue) | Setup time | Difficulty |
|---|---|---|---|---|
| 7-foot | 39” × 78” | 13’ × 11’ | 6-8 hr | Easy, lighter slate |
| 8-foot | 44” × 88” | 16’ × 14’ | 8-10 hr | Standard |
| 9-foot | 50” × 100” | 18’ × 16’ | 10-14 hr | Hardest, heavier slate, longer level checks |
Floor check: lay your 24-inch level on the floor in eight positions (the four corners of the future table footprint, plus the four midpoints). Note any dips deeper than 1/4 inch over 24 inches. Drops smaller than that get shimmed during leg install. Drops bigger than 1/2 inch should be fixed at the floor with self-leveling compound. Shimming a one-inch step makes a wobbly leg.
Environment: keep the room between 60 and 75°F at 40 to 50 percent humidity. Pool cloth is wool blend; below 30 percent humidity it gets brittle, above 60 percent it absorbs water and rolls slow. A basement dehumidifier is a $200 investment that pays back in cloth lifespan alone.
Lighting: install the overhead light at 30 to 36 inches above the slate, centered over the playing surface; our best pool table lights guide covers fixtures that actually spread evenly. A glare line across the cloth on a side-lit table will drive you out of your mind during play. Some owners also use a rug under the pool table. It doesn’t help leveling, but it softens dropped-cue noise and protects the floor.
Step 2: Assemble the Frame and Legs
Lay every part out first, build the long rails into the frame, attach legs hand-tight, then check diagonals before you torque anything down. A square frame is the foundation; a racked frame guarantees a tilted slate.
Unbox carefully. Inspect every wood surface for cracks and splinters, and look for shipping warp, before you touch a screwdriver. Manufacturers will replace damaged pieces but only if you flag them within the return window.
Frame sequence:
- Connect the long rails (the 78 to 100-inch sides) to the corner blocks first.
- Attach the short rails (head and foot). Snug, not torqued.
- Bolt the legs into corner pockets or leg brackets. Hand-tight.
- Check for square: measure both diagonals corner to corner. They should match within 1/8 inch. If they don’t, tap one corner block with a rubber mallet until they do, then lock the frame bolts.
- Install the center support if your table has one. Skipping this is the #1 reason cheap 8-foot frames sag in the middle after two years.
Don’t fully torque any frame bolt yet. You’ll touch them again after the slate sits.
Step 3: Install the Slate
Slate is the single component the table can’t tolerate any error on, so go slow and get a second person for the lift, supporting each piece on three points minimum. A three-piece slate weighs 375 to 450 lbs total (125-150 per piece); one-piece slate, common on 7-foot bar tables, runs 300 lbs and up as a single slab.
Slate weight reality: two adults can carry one slab if they have back belts and a clear path. One-piece slate needs three or four people and a furniture dolly with non-marring wheels.
Acclimate the slate. If the table came from a cold truck or a non-conditioned warehouse, give the slate 24 to 48 hours in the install room before you set it. Slate doesn’t expand much, but the wood frame underneath does, and you don’t want the geometry shifting after you’ve leveled.
Clean the frame contact surface before the slate goes on. Vacuum every shaving and dust speck off the rails where the slate sits. A clean contact face is the difference between a slate that holds level and one that “settles” two weeks later.
One-piece slate placement:
- Two or more lifters position the slate centered on the frame.
- Verify it’s fully supported on all four cabinet rails, no overhang, no gap.
- Initial level pass with the 24-inch level: lengthwise and widthwise first, then both diagonals.
Three-piece slate placement:
- Set the center piece first. This is your reference for alignment.
- Set the head piece, butting tight against the center. The seam should be flush. Run a fingernail across it; you should feel nothing.
- Set the foot piece the same way.
- Lay the steel straightedge across both seams. Daylight under the straightedge means the slate isn’t aligned. Fix this with thin shims between the slate and the frame. Leg shims are for frame tilt; slate-to-frame shims correct piece-to-piece misalignment. They’re different problems.
After the slate is on, do a slow roll: ball at center, no push, watch where it goes. It should sit still. If it tracks anywhere, that’s your starting point for shimming. We’ll fine-tune in Step 7. For now you want it close enough that the rails will fit clean.
Step 4: Apply Beeswax to Slate Seams (Three-Piece Only)
Beeswax fills the seam gaps so cloth doesn’t sag into them and so dust can’t pack into the joint. It stays slightly soft so future leveling adjustments don’t crack it. Skip this step on a three-piece slate and you’ll see a “ghost line” through the cloth where seams pull down.
Process:
- Clean the seam with a soft brush. No metal tools, since they scratch slate.
- Warm the wax in your hands or with a heat gun on low for 10 seconds. Cold beeswax doesn’t pack.
- Press wax firmly into the entire seam length with a putty knife. Don’t be shy, overfill slightly.
- Scrape level with a steel straightedge held flat against the slate. Pull it toward you; the excess peels off in a clean ribbon.
- Run a fingertip along the seam. You should feel slate, then nothing where wax fills the gap, then slate again. No bumps, no dips.
Never use silicone caulk, wood glue, or epoxy. They harden permanently. The day you need to relevel (and you will), you’ll have to chip cured silicone off three slate edges with a chisel. Beeswax peels out with a putty knife in 30 seconds.
Step 5: Install the Cloth
Let the cloth acclimate in the room for 24 hours first, then stretch it from the center outward in opposing pulls and staple to the rail bottom every 4 to 6 inches. Cold or rolled cloth shrinks after install and pulls wrinkles you can’t fix without restapling.
The Championship Saturn II 21-oz wool blend is the Amazon default for home tables. Tournament tables use a faster Simonis 760 or 860, but for casual play Saturn II runs cheaper and is forgiving for a first install. If you’re refelting an older table, the cost to refelt a pool table breaks down DIY versus pro pricing.
Acclimate first. Open the cloth roll 24 hours before install (48 if winter or the cloth came from a cold delivery). Let it lie flat. This step prevents the most common refelt failure: wrinkles that show up two weeks later.
Cut to size. Measure your slate, add 4 inches per side for wrap. For an 8-foot table, you’ll cut roughly 60” × 104”. Don’t cut close. Extra cloth tucks easily; short cloth restarts the project.
Install sequence:
- Center the cloth lengthwise on the slate. The directional weave runs head-to-foot. Check the cloth backing for an arrow.
- Smooth from center outward with a clean white rag. Keep metal tools and hard plastic edges away from the cloth.
- Tack the long rails first. Pull cloth firmly (not aggressively) toward the rail underside and staple every 4 to 6 inches.
- Move to the short rails. Pull at a slight diagonal away from the corners to prevent bunching at the pocket cuts.
- Trim the corners with sharp scissors, leaving 1 inch of overlap to tuck.
- Staple every 2 inches around the pocket openings, which is where cloth fails first.
Tension target: firm but not shiny. If the cloth looks pulled tight enough to see weave grain, you’ve stretched it past its working tension. Back off a row of staples and redo it.
For maintenance after install, see how to clean a pool table. Most cloth deaths come from vacuuming with a beater bar, not from playing on it.
Step 6: Attach the Rails and Cushions
Bolt rails to the slate in a cross pattern at roughly 15 to 20 ft-lb of torque, never sequentially around the table. Cross-pattern torquing keeps the rail flat against the slate; sequential torque pulls the rail into a banana shape and kills cushion rebound on one end.
Cushion rubber matters more than people realize. K-66 profile is the BCA-spec rubber for tournament play and what most slate tables ship with. It gives a sharp, predictable rebound. K-55 is the cheaper profile on MDF tables; rebounds are mushier. Inspect your cushions before install: cracked or hardened rubber means replace before bolting down, and so do compressed flat spots.
Sequence:
- Position the long rails first against the slate. They should sit flush against the slate edge, no gap, no daylight.
- Hand-tighten each rail bolt until snug, working in a cross pattern (left-front, right-back, right-front, left-back, then sides).
- Final torque to 15 to 20 ft-lb in the same cross pattern. A click-type torque wrench with a 1/4-inch hex bit reads this range cleanly.
- Install the short rails the same way.
- Slot in pocket jaws (the curved metal or plastic ball-funnels). They should snap or screw into pre-drilled rail holes.
- Test rebound: roll a ball at the cushion at moderate speed. It should rebound across the table to within 6 inches of where it started. Dead cushions or wild deflection means a torque issue or hardened rubber.
If the rebound is even on one rail and dead on another, loosen the dead rail’s bolts and check for a slate-to-rail gap. That’s almost always the cause.
Step 7: Final Leveling
The pass mark is a 1/16-inch total drift across the slate, or roughly 0.029 degrees on a calibrated 24-inch level. Anything tighter than that and you’re working at the limits of slate manufacturing tolerance anyway. For a deeper read on tolerance and how it actually feels in play, see how level does a pool table need to be.
You’ve done a rough level pass before cloth went on. Now redo it with everything bolted down, because rails compress the slate slightly and can shift the table 1/32 inch off whatever you measured before.
Three-test procedure:
The marble roll. Place a 1/2-inch steel ball or a glass marble at center. It should sit. Roll it slow lengthwise; it should track straight. Roll it widthwise and expect the same, then check both diagonals. Anywhere it curves more than 1 inch over 6 feet of travel is a low spot in that direction.
The level read. Lay the 24-inch level lengthwise at four positions (head, center, foot, and a diagonal). Bubble centered or one mark off either side is a pass. Two marks off is fail.
The corner check. Place the marble within 12 inches of each corner. It should sit still or roll very slowly toward the center. Rolling outward means the corner is high.
Adjustment method:
- Identify the low corner (the marble rolls toward it).
- Add a thin composite shim under the diagonal high leg rather than the low one. The mechanics work the opposite of what you’d expect.
- Adjust 1/32 inch at a time. Use shim packs with calibrated thicknesses; never freelance with cardboard or paper.
- Retest after every shim. Big single moves overshoot.
- Once it passes all three tests twice, glue the shims to the leg base with construction adhesive so they don’t kick out.
A finished home table that passes the marble roll in all six directions (lengthwise, widthwise, both diagonals, and both corner sweeps) is set. You don’t need to chase a tournament-grade machinist-level reading unless you’re hosting league play.
Step 8: Install Pockets
Pocket jaws set the throat angle and the liners fill the throat; trim plates cover the staples. Get the throat angle wrong and balls rattle on the cut instead of dropping clean.
Pocket types:
- Leather drop pockets, traditional, replaceable. What most home slate tables ship with.
- Nylon mesh pockets, budget option, easier to clean, looks cheaper.
- Auto-return pockets, internal ball-return system; common on coin-op tables, rare in home installs.
Install:
- Position pocket jaws at corners and side rails. Confirm they sit flush against the rail-end cuts.
- Slide pocket liners into the jaws. They should fit snug, no gap a ball could squeeze past.
- Tighten retention screws evenly so the pocket mouth is symmetric. Asymmetric pocket mouths cause “good shots that rattle” and drive players crazy.
- Drop a cue ball into each pocket. It should fall clean without binding or tilting.
- Verify the pocket facing-angle: most home tables run a 12-degree angle from the rail nose. Tournament tables run tighter (5-6 degrees) for harder pockets. Check your manufacturer spec. Olhausen and Diamond publish their facing angles in the install manual.
Mark the Spots and Test Play
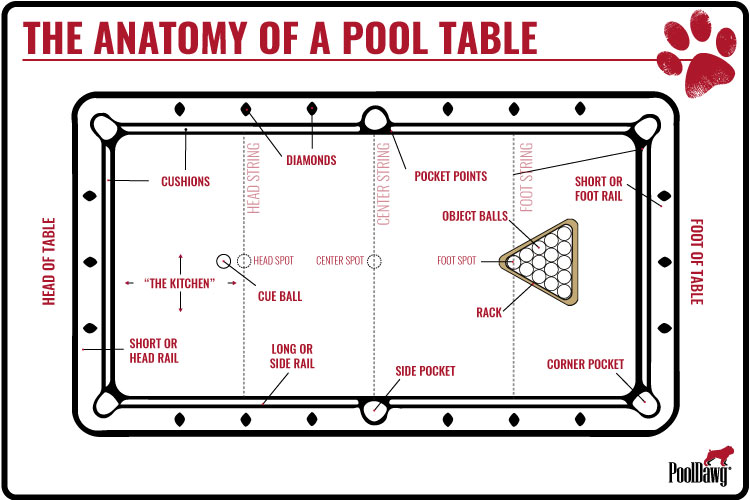
Snap a chalk line between diagonal pocket centers to find the centerspot, then mark the headspot and footspot using the BCA 2:1 ratio. Without these spots, racking accurately is guesswork.
Standard markings:
- Centerspot: intersection of two chalk lines drawn between opposite pocket centers (corner-to-corner diagonals). Mark with a small adhesive spot or cloth-friendly marker.
- Footspot: on the long axis of the table, at 1/4 of the playing surface length from the foot rail. For a 100-inch playing surface, that’s 25 inches from the foot cushion.
- Headspot: mirror of the footspot, 25 inches from the head cushion on the same long axis.
- Headstring: an imaginary line across the table through the headspot, perpendicular to the long rails. Cue ball goes behind this line on the break.
Once spots are marked, rack and break. The cue ball should come back to roughly the same area off the head rail it left. That’s a clean break on a flat table.
Pro Install vs DIY: Real Cost and When to Hire
DIY costs $130 to $375 in tools and consumables and saves $250 to $500 in pro fees, but only if your floor is decent and the table isn’t tournament-grade. Pros bring laser levels, machinist levels, install warranties, and 200+ hours of repeat experience.
| Path | Cost | Time | Best for |
|---|---|---|---|
| DIY install | $130-$375 | 8-12 hr | Decent floor, mid-range slate, willing to recheck level after a month |
| Pro standard install | $250-$500 | 3-4 hr | Most home tables, includes warranty on the install |
| Pro full level + cert | $600-$1,000+ | 4-6 hr | Tournament-grade tables, league play, one-piece slate |
DIY when: floor is concrete or solid hardwood; table is three-piece slate (not one-piece); you’re patient; you have one helper for the slate lift; the table costs $1,500 or under.
Hire a pro when: floor is severely uneven; one-piece slate; tournament/league use; budget table over $3,000 (the $400 install is cheap insurance); you want a written install warranty.
If you’re in the $1,500-and-under range and shopping, see the best pool tables under $1,500 and best 8-foot pool tables. The install economics work different at each price tier.
Common Setup Mistakes
The errors that ruin first installs:
- Skipping the floor check. Half of home installs go sideways because the installer trusted that the floor was flat. It isn’t. Check it with the level before you uncrate the table.
- Over-torquing rail bolts. Cranking past 20 ft-lb cracks the rail wood and warps cushion alignment. Snug-then-quarter-turn is a usable rule of thumb if you don’t have a torque wrench.
- One-direction leveling. Lengthwise level alone misses widthwise tilt. Test all six directions: lengthwise, widthwise, both diagonals, and both corner sweeps.
- Stapling cold cloth. Cloth that didn’t acclimate shrinks after install and pulls wrinkles. The 24-hour acclimation rule isn’t optional.
- Skipping seam wax on three-piece slate. Cloth sags into unfilled seams. Ghost lines show within a month.
- Using cardboard shims. Cardboard compresses unevenly under 700 lbs. The table goes back out of level in two weeks. Composite or hardwood shims only.
- Bolting rails sequentially around the table. Pulls the rail into a curve. Cross-pattern torque every time.
- Installing in a damp basement. Wool cloth absorbs water; below-50°F wood frames contract. Run a dehumidifier from before the install until well after it.
- Trusting square eyeballing. Measure diagonals with a tape. 1/8-inch out is a pass; anything more racks the cloth.
- No second pass on level after rails are bolted. Rails compress the slate. The level reading you took before rails went on is no longer the level reading.
Going deeper on tolerance: how level does a pool table need to be →
Moving It Later
If you ever need to relocate the table, don’t drag it. For short moves see how to move a pool table a few feet. For full relocations, whether you can move a pool table without taking it apart covers the math. The short answer is “you shouldn’t.”
A move always means a relevel. Plan a fresh shim pass and a marble-roll test on day one in the new room. Slate that traveled by truck has shifted, even if you can’t see it.
Worth checking out: if you’re refelting as part of the install, the Championship Saturn II Billiard Cloth on Amazon is the home-table default. And the 24-inch level advice above wasn’t a throwaway; the Stabila Type 80A is the cheapest insurance in this whole project.
Related Articles
For more on this topic, check out standard pool table sizes, how level does a pool table need to be, how to clean a pool table, the pool table room planner, best 8-foot pool tables, and how much it costs to refelt a pool table.
Browse our full Pool Tables hub for tested picks, buying guides, and head-to-heads.