A bad rack ruins your break before you even swing. If the balls are loose or placed wrong, the energy from your break scatters instead of transferring cleanly through the formation. I’ve played on tables where every break felt dead, and the problem was always the same: sloppy racking.
The 15-second rack: apex ball on the foot spot, push forward with your fingers inside the triangle until every ball is touching the next one with no gaps, then lift the rack straight up — slowly enough that nothing shifts.
Getting a proper rack takes about 15 seconds once you know what you’re doing. Here’s how to do it for every major game.
What You Need to Know First
Every pool game starts with the object balls arranged on the far end of the table. The front ball in any rack formation is called the apex ball, and it sits on the foot spot, which is the small dot (or unmarked center point) on the table near the far short rail.
Racks come in two shapes. A triangle rack holds all 15 balls and is used for 8-ball, straight pool, and most other full-rack games. A diamond rack holds 9 balls and is used for 9-ball. You can rack 9-ball with a triangle rack if you don’t have a diamond, but a diamond rack gives tighter results.
The head string is the imaginary line at the opposite end of the table where the cue ball sits for the break. You rack at the foot end, break from the head end.
| Game | Balls Used | Rack Shape | Apex Ball | Center Ball | Corner Balls |
|---|---|---|---|---|---|
| 8-Ball | 15 | Triangle | 1-ball | 8-ball (row 3) | 1 solid + 1 stripe |
| 9-Ball | 9 | Diamond | 1-ball | 9-ball | N/A |
| 10-Ball | 10 | Triangle | 1-ball | 10-ball (row 3) | 2-ball + 3-ball |
| Straight Pool | 15 | Triangle | Any ball | Random | Random |
| Cutthroat | 15 | Triangle | Any ball | Random | Random |
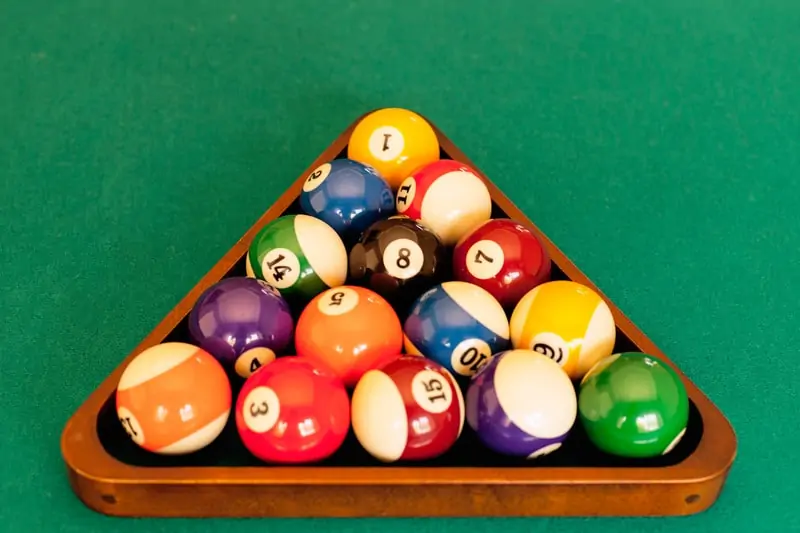
How to Rack for 8-Ball
Place all 15 balls inside the triangle rack. Three balls have specific positions:
The 1-ball goes at the apex (front of the triangle) directly on the foot spot. The 8-ball goes dead center in the third row. The two back corner balls must be one solid and one stripe. Every other ball fills in randomly.
Push the rack forward so the apex ball sits right on the foot spot. Before you lift the rack, use your fingers inside the triangle to press the balls forward and tight against each other. No gaps between any balls. Then lift the rack straight up, slowly, so nothing shifts.
I’ve seen people spend two minutes arranging every ball by number. Don’t bother. Beyond the three required positions, random placement is fine and actually required under BCA rules. The 8-ball center, 1-ball apex, and mixed back corners are the only things that matter. (If you’re curious why pool balls have numbers in the first place, that’s a different rabbit hole.)
How to Rack for 9-Ball
Use a diamond rack with 9 balls. The 1-ball goes at the apex on the foot spot. The 9-ball goes in the center of the diamond. The 2-ball goes at the bottom point. Everything else fills in randomly.
If you only have a triangle rack, you can still rack 9-ball. Place the 1-ball at the triangle’s apex on the foot spot, then build the diamond shape within the triangle’s space. Keep the 9-ball centered and the 2-ball at the bottom. Make sure all balls are touching before you lift.
The diamond shape is tighter than a triangle by nature, but loose balls still kill the break. Press them forward before lifting.
How to Rack for 10-Ball
10-ball uses a triangle rack with 10 balls arranged in a triangular formation (4 rows: 1-2-3-4). The 1-ball goes at the apex on the foot spot. The 10-ball goes in the center of the formation (second row, either position works depending on house rules, but center of the third row is most common). The 2-ball and 3-ball go in the two back corners.
10-ball racking follows the same principles as 8-ball. Tight formation, apex on the foot spot, specific balls in specific spots.
Getting a Tight Rack Every Time
This is the part that actually matters. A tight rack transfers energy from the cue ball through the entire formation evenly. A loose rack absorbs energy, and the balls barely move.
Step 1: Place all balls in the rack loosely. Don’t worry about positioning yet, just get them in.
Step 2: Arrange the required balls (apex, center, corners) into their correct positions.
Step 3: Slide the entire rack forward so the apex ball covers the foot spot.
Step 4: Put your fingers inside the rack, behind the back row of balls, and push everything forward firmly. You want every ball pressing against the ones in front of it with no daylight between them.
Step 5: Lift the rack straight up. Not forward, not angled. Straight up. If any ball moves when you lift, re-rack.
I use this method every time and the difference is obvious. A tight rack produces a loud, crisp crack on the break. A loose rack makes a dull thud and the balls barely spread.
The Magic Rack Alternative
If you’re tired of fighting with traditional racks, the Magic Rack is worth trying. It’s a thin plastic template that sits flat on the table. You place balls on top of it, and the template holds them in perfect position. Unlike a traditional rack, you don’t remove it before the break. The cue ball blasts through the formation and the template stays flat under the balls.
The advantage is consistency. You get a perfect rack every single time without the skill of manually tightening. The downside is that some players and leagues don’t allow them, and they can wear out the felt slightly faster in the rack area. For home tables and casual games, they’re excellent. Check out the Magic Rack on Amazon if you want to try one.
Common Racking Mistakes
Lifting the rack at an angle. This is the most common mistake. When you pull the rack toward you instead of lifting straight up, you drag the front balls backward and create gaps. Always lift vertically.
Not pressing balls forward. If you just drop balls in the rack and lift, there will be gaps. Every rack needs that final push forward with your fingers to eliminate space.
Ignoring ball placement rules. In league or tournament play, a rack with the 8-ball in the wrong spot or two solids in the back corners can be called illegal. Know the requirements for whatever game you’re playing.
Dirty balls. Chalk dust and grime on the balls create friction that prevents them from sitting tight. If your balls are filthy, clean them or upgrade to Aramith phenolic balls that resist chalk buildup better than polyester sets.
Using the wrong rack size. A triangle rack for 9-ball leaves too much space. A diamond rack for 15-ball games doesn’t exist. Match the rack to the game.
FAQ
Why does my break not spread the balls even when I hit hard?
A loose rack is the most common culprit. Balls need to be tight and compact so they transfer energy from the cue ball evenly across the group. Use your fingers inside the rack to push balls forward before removing it.
What’s the difference between a triangle rack and a diamond rack?
A triangle rack is used for 8-ball and other 15-ball games. A diamond rack is used for 9-ball with just 9 balls. Triangle racks are wider; diamond racks are narrower and diamond-shaped.
Should the apex ball be on the foot spot or the head spot?
The apex ball (the front ball of the rack) should always be placed on the foot spot, which is the dot near the far end of the table from where you break.
What should I do if balls move when I lift the rack?
Re-rack. A properly racked set should be completely still when you lift the rack. If balls are shifting, apply more pressure with your fingers to tighten the formation before removing the rack.
Is the Magic Rack worth buying?
Yes, if you struggle to get tight racks consistently. The Magic Rack is a thin template that stays under the balls until after the break, so you never risk disturbing the formation when lifting. It’s especially useful for casual players.
Related Articles
For more on this topic, check out how to play pool, 8-ball rules, 9-ball rules, 10-ball rules, how to break in pool, and cutthroat pool rules.
Browse our full Rules hub for tested picks, buying guides, and head-to-heads.